This is default featured slide 1 title

Go to Blogger edit html and find these sentences.Now replace these sentences with your own descriptions.This theme is Bloggerized by Lasantha Bandara - Premiumbloggertemplates.com.

This is default featured slide 2 title

Go to Blogger edit html and find these sentences.Now replace these sentences with your own descriptions.This theme is Bloggerized by Lasantha Bandara - Premiumbloggertemplates.com.

This is default featured slide 3 title

Go to Blogger edit html and find these sentences.Now replace these sentences with your own descriptions.This theme is Bloggerized by Lasantha Bandara - Premiumbloggertemplates.com.

This is default featured slide 4 title

Go to Blogger edit html and find these sentences.Now replace these sentences with your own descriptions.This theme is Bloggerized by Lasantha Bandara - Premiumbloggertemplates.com.

This is default featured slide 5 title

Go to Blogger edit html and find these sentences.Now replace these sentences with your own descriptions.This theme is Bloggerized by Lasantha Bandara - Premiumbloggertemplates.com.

Saturday, March 1, 2014

Update Galaxy S4 Active I9295 to XXUBML3 Android 4.2.2 Official Firmware

XXUBML3 Android 4.2.2 can now be installed on Samsung Galaxy S4 Active I9295 which is the latest Jelly Bean update for this phone. Samsung KIES should already have this update by now but for those who are not able to get this from there can follow our guide for manual installation. No change log for this firmware yet, but we think it is more of a bug fix update. I9295XXUBML3 firmware is an official firmware by Samsung, not a custom or modifiedfirmware. You can easily update Galaxy S4 Active I9295 to XXUBML3 Android 4.2.2 Jelly Bean official firmware. Please note, you do not need to have ClockworkMod Recovery installed in order to install this firmware.
As you continue reading below, we will guide you how to install XXUBML3 Android 4.2.2 Jelly Bean on Galaxy S4 Active I9295 using ODIN. We have also given some tips on how to backup your phone data and have given some other important tips. Don’t forget to backup all your apps and personal data as a precaution. The main task at hand before proceeding is to make sure that all of your data has been backed up and accounted for as we don’t want anyone losing there data due to issues. Not sure when Samsung will release the next Jelly Bean major update, but this what they have released for now. Let’s continue with the tutorial now.
Samsung-Galaxy-S4-Active
Disclaimer: All the custom ROMs and firmwares, official software updates, tools, mods or anything mentioned in the tutorial belong to their respective owners/developers. We (TeamAndroid.com) or the developers are not to be held responsible if you damage or brick your device. We don’t have you on gun point to try out this tutorial ;-)

Android 4.2.2 XXUBML3 Firmware Details:

PDA: I9295XXUBML3
CSC: I9295OJVBML1
Version: 4.2.2
Date: 2014 February

Samsung Galaxy S4 Active USB Drivers

You will need to connect your Android phone with the computer. For that, please make sure you have installed the USB drivers for Samsung Galaxy S4 Active properly. If not, you can download the latest official drivers from our Android USB Drivers section here:
Download Samsung Galaxy S4 Active USB drivers!

Backup and Other Important Tips

Done with the USB drivers? Perfect. The tutorial is on the next page, but first, please take a look at the following tips and important points you need to take care of. These are important, as we don’t want anyone losing their personal data or apps:
Always backup your important data that you might need after you install a newcustom ROM, an official software update or anything else. Make a backup for just in case, you never know when anything might go wrong. 
Samsung users can also back up data using Samsung KIES. If you backup datamanually, you get more options what to choose from and it is very easy to move data across Android devices from different manufacturers, i.e moving Samsung Galaxy Note backup data to HTC One X.
If you already have a custom recovery (ClockworkMod, TWRP etc.) installed on your phone, we strongly recommend a backup using that as it creates a complete image of your existing phone set up.
A few more optional tips that you should remember:
1. Having problems connecting your Android phone to the computer? You need to enable USB debugging mode. 
2. Make sure your Android device is charged up to 80-85% battery level. This might help you: How to Check Battery Percentage. Why? Because, if your phone goes off suddenly while installing a custom ROM, flashing an official firmware update or installing mods etc. — your phone might get bricked or go dead permanently. No one wants that, right?
4. Most of the tutorials and how-to guides on Team Android are for factory unlocked Android phones and tablets. We recommend NOT to try our guides if your phone is locked to a carrier, unless we have specified the carrier name or device model.
If you find the above tips useful and they were helpful to you, please consider giving us a +1or LIKE to thank us!

Omega ROM for Samsung Galaxy Note 10.1 – Android 4.1.2 Jelly Bean

Omega ROM for the Samsung Galaxy Note 10.1 is based on stock Samsung firmware. Omega ROM provides a stock experience with under the hood mods to provide a one of a kind experience on your tablet.
N8000-02

ROM Features & Details:

  • Based on firmware XXCMA5 Android 4.1.2 (Date: 28/01/2013)
  • Support for N8000 + N8010 + N8013
  • Kernel Stock XXCMA5 for N8000
  • Kernel Stock XXUCMA5 for N8010
  • Kernel Stock UEUCMA3 for N8013
  • Modem XXCLL1 for N8000
  • Multi csc set to EUR
  • efs Backup (added the option to create efs backup during installation)
  • Omegadroid Walk Bootanimation by Jorq1H and anbech
  • Omegadroid wallpapers added in default wallpapers
  • Omega Files app
  • Omega Settings app
  • Busybox
  • SuperSU
  • init.d support without the need of a kernel that supports init.d
  • Aroma installer – Installation is fully customizable by user and there is options to installeverything or remove all Bloatware.
  • User can flash apps and bloat apps any time without the need to flash again the whole rom, (flashing the rom once is required)
  • Full Wipe option before installation
  • Wipe cache partition automatic before roms installation
  • Wipe Dalvik Cache automatic during installation
  • Wipe preload partition automatic before roms installation
  • Google apps from Android 4.2:
  • Playstore
  • Gmail
  • Keyboard Android with Gesture Typing from Android 4.2
  • Omegas addon applications:
  • Es File Explorer (with great Root Explorer)
  • Hide It Pro
  • Download All Files
  • ZArchiver
  • Addfree
  • Flash player Support

Developed by: ::indie::
Official ROM Website:
Download Now

Clean ROM for Samsung Galaxy Note 10.1 (2014) – Android 4.3 Jelly Bean

Clean ROM for the Galaxy Note 10.1 2014 edition is based on the Android 4.3 TouchWizfirmware. Clean ROM provides a stock but enhanced experience. With performance tweaks, this ROM out performs the original firmware. Also, with this ROM you get all the bells and whistles of a top speck ROM optimized for a Tablet.
CR-1.1

ROM Features & Details:

  • Seriously Debloated! Removed apps
  • Full Stock Look, no visual modifications
  • Hardware Rendering and other hardware performance enhancements
  • Lock Screen Options for Unlock affect
  • Rooted With SuperSU
  • De-Odexed
  • Zip Aligned
  • Init.d support
  • All Apps up to date at time of posting.
  • Stability that is nothing short of legendary.

Developed by: scrosler
Official ROM Website:
Download Now

Liquid Smooth ROM for Samsung Nexus 10 – Android 4.2.2 Jelly Bean

Liquid Smooth ROM is based on Android 4.2.2 Jelly Bean. This ROM has been built with one aim in mind that is “smoothness”. Performance mods picked from everywhere make it exactly so. Customization on this ROM is also superb with added functionality.

Liquid-Smooth-Featured

ROM Features & Details:

  • LinaroPrebuilt4.74Toolchain
  • -O3Strict-Aliasing&ISOC++11Mode
  • ARMOptimizedStringHandlingRoutines
  • LinaroandCodeAuroraOptimaztions
  • Customizablelockscreenbuttons/sliders
  • Chronusclockwidget
  • Customizablehardwareandsoftwarekeys
  • Transparentnavbarandstatusbar
  • Customizablenavbarring
  • Navigationbarwidgets
  • Customizablepowermenu
  • Notificationpowerwidget
  • Customizablequicksettingspanel
  • Statusbarmods
  • Themeengine
  • Quiethours
  • Volumerockermusiccontrols
  • FullRotation
  • Customizablebatteryandnotificationlight
Developed by: deadman96385 Official ROM Website:Download Now

Slim Bean ROM for Samsung Nexus 10 – Android 4.3 Jelly Bean

Slim Bean ROM is the most diverse ROM series present. With support present for many devices, including the Nexus 10, and same experience over every device.
SlimBeanOP2

ROM Features & Details:

  • The Real Dark Slim
  • Notification drawer Shortcuts
  • Full hardware key rebinding!
  • Keyboard rotation
  • SlimCenter

Developed by: fronti90
Official ROM Website:
Download Now

Carbon ROM for Samsung Nexus 10 – Android 4.3 Jelly Bean

Carbon ROM is based on Android 4.3. Carbon ROM is the only ROM providing so manyfeatures in one package. This ROM includes features cherry picked from AOKP, PA and Cyanogen MOD.
screen1s

ROM Features & Details:

  • The developers behind this ROM think the features that you are looking for are already included in the ROM.
  • Try for yourself to find out!

Developed by: dg4prez
Official ROM Website:
Download Now

Cokelat ROM for Samsung Galaxy Mega 5.8 Duos – Android 4.2.2 Jelly Bean

Cokelat ROM is available for the Samsung Galaxy Mega 5.8 Duos. It is based on the stockSamsung update which is based on Android 4.2.2. It is a light ROM which tries to imitate AOSP while being based on stock. TouchWiz is removed and replaced with NOVA launcher to make it feel like vanilla Android.
5p2g

ROM Features & Details:

  • Rom based on I9152XWUAMH3 (24 August 2013) – XSA
  • Light size, its only 529,4mb from original almost 1gb ROM
  • Pre rooted and updated SuperSU 1.65
  • Fully DEODEXED APP and SYSTEM
  • Busybox installed
  • Removed bloatware
  • Remove touchwiz and change with NOVA (Free edition) to make AOSP look
Developed by: jusho
Official ROM Website:
Download Now

Install Android 4.4.2 KitKat on HTC One (Sprint) Using AOKP ROM

Since 2011 Android Open Kang Project (AOKP) has been involved in making the best Android Custom OS and so far they have been successful to make a perfect rom for high end Android Smartphones. They are just awesome as compare to the stock android os distributed by manufacturers in terms ofperformance, customization and features. Today, we’ll be learning using step by step instructions on howto install AOPK Android 4.4.2 KK Nightly on your Sprint HTC One. Flashing acustom rom is really simple but you’ll root access and custom recovery. Before you proceed it is recommended that you first read the guidelines and requirements, which will help you to safely and successfully install it.
AOKP KitKat ROM for Sprint HTC One

Requirements and Guidelines:

  • Rooted HTC One Sprint (m7spr) with the latest version of CWM orTWRP Recovery installed.
  • AOKP Android 4.4.2 KK Nightly (Download Link)
  • GApps for KK Custom ROMs (Download Here)
  • Take Nandroid Backup of your ROM using Recovery (Learn Here)
  • More than 50% battery charge would be required
  • Flash at your own risk.

How to Install Android 4.4.2 KitKat on Sprint HTC One Using AOKP Custom ROM

1. First of all download the required files from the above links and then connect your HTC One to PC via the USB cable and without unzipping thedownloaded files move it to the root storage of your internal/external storage.
2.  Disconnect your phone and Reboot it into Custom Recovery Mode, Holds the Volume Up+Home+Power buttons together simultaneously for about 6 to 8 seconds.
3. First I would recommend you to take Nandroid Backup of your current ROM, so that you have a Restore point, if in case you later decide to switch back to your current ROM and Settings, it will help you to restore easily without any issues.
4. Use the recovery options to prepare your phone for Custom ROMinstallation, perform the following actions:
  • Navigate to Wipe Data/Factory Reset and select ‘Yes’
  • Wipe Cache
  • Wipe Dalvik Cache
5. Next navigate to the option “Install Zip from SD card” and “Choose zip from SD card” or whatever location you’ve placed your files.
6. Browse the .zip file of the AOKP and confirm the options install it.
7. Once that is flushed successfully, Repeat the same process to flash the GApps zip package also.
8.  Once all the steps completes successfully, navigate back to the main recovery menu and Reboot your phone using the ‘Reboot system now’ or ‘Reboot’.
Congratulations!! You’ve successfully installed AOKP KK ROM on your Sprint HTC One. Just wait for your phone to boot normally, you should be running AOKP Android 4.4.2 on your phone.

How to Root Galaxy S4 (GT-i9500) on Android 4.4.2 KitKat

We recently posted on how to update Galaxy S4 gt-i950o to Android 4.4.2 using the official firmware update. Now when you have updated your phone, now its time to get root access. In this section, we’ll guide you using the step by step instructions on how to easily, safely gain root access on Galaxy S4 running on Android 4.4.2 using CF-package rooted kernel. This method is 100% safe and is also the easiest way to root galaxy s4.
root-samsung-galaxy-s4-gt-i9500

Guidelines and Requirements:

  • Samsung Galaxy S4 GT-i9500 running on Android 4.4.2 KitKat
  • CF-Root package (Download Link)
  • Odin3 v3.07 (Download Here)
  • You’ll have to install USB Drivers, if Samsung Kies is installed that is ok otherwise download USB drivers Here.
  • Enable USB Debugging from phone Settings>Developers Options.
  • At least charge your phone to 50%.
  • Root at your own risk

How to Easily Root Samsung Galaxy S4 GT-i9500 Running on Android 4.4.2 KitKat Using CF-Root

Step 1: First download the required files (links are given above) and unzip the files to a new folder on your desktop.
Step 3: Next, Turn Off your phone and reboot it into ‘Download Mode’ by Pressing and Holding the Volume Down + Home + Power buttons at the same time for a few seconds and release it when you see a warning message on your screen. You’ll be asked to hit the Volume Up to continue.
Step 4: Once successfully booted into Download Mode, Double click on the Odin3-v3.07 and connect your Galaxy S4 to PC via the USB cable.
Step 5: At this point just make sure that Odin3 has recognized your device and the ID:COM port will either turn blue. You will also notice Added!! in the message section of Odin, which verifies that your device is recognized and has made connection with Odin3.
Step 6: Finally, Hit the ‘PDA’ button and browse the rooted kernal tar.md5, file and click on the ‘Start’ button to initiate rooting process for Galaxy S4.
Step 7: The process will take about 40 to 50 seconds and once it is completely flushed, Odin will prompt you via the PASS!! message and your phone willautomatically reboots.
Congratulations! Your Samsung Galaxy S4 has successfully been rooted on Android 4.4.2 KitKat. To make sure your phone is rooted, Open Google Play Store App on your device and look for ‘Root Checker’, install it and run to verify root access. You can now install Apps which requires root access, flash custom recovery to install Custom ROMs and much more you can do using Root. Go on and explore the world of android.

How to Flash Custom ROM on Android Phone/Tablet

Custom ROMs are mostly debated and talked term in most of the Android Communities on the web, thanks to the developers who have put in their time and energy who makes customized and performance improved custom roms for your Android devices. Today, in this section, we will learning on how to flash custom rom using thestep by step instructions. But before we move on, I know most of you do know about Custom ROM but then I would explain in brief what are actually custom roms and why you should use them.
Custom ROMs

What is a Custom ROM?

We all know that Android is an open source os by Google Inc which gives the permission, authority to developers to modify and add new features and tweaks by modifying the existing code which is distributed by Google publicly. Hopefully this has given you an idea of what is actually is Custom ROM in terms of Android terminology. But remember every Custom ROM is not working on all devices, developers has to make it compatible for your specific android device, so when downloading custom roms, double check that it is compatible with your device otherwise you’ll end up bricking your phone.

What are Popular and Best Custom ROM?

Well, there are various Custom ROMs available on the web and most them have their own features, customization frameworks and tweaks, XDA developers community is the best place to search around and find the best custom rom available for your device. However I do have checked and tested a number of Custom ROMs and I would recommend you to use if your device. Remember that most ROMs are available in beta, which is most the time called, Nightly which means they are beta/testing mode, which means that you might expect some bugs and features not working on your phone but there is nothing to be worried about it, because developers on the daily basis tweak their roms in order to make stable and perfect with regards to itsperformance. Well, now come back to the discussion, what are best Custom ROM? Below is the list of Custom ROMs with their official websites:
And many more… (If you do know of any best suggests us and we’ll add it here)

Why Use Custom ROM?

There are several reasons why you should use Custom ROM instead of the Stock ROM. Down below I have highlighted some of the benefits of using Custom ROM:
  • Frequently Updated as compare to stock, whenever bugs are spotted developers responds quickly and fix them. (I am talking best roms!!)
  • There are many android devices which does not officially receives any more updates, Just like Samsung Galaxy S2. Custom ROM gives you the opportunity to test out the latest features before it is officially released for your device.
  • Built-in tweaks which further improves the performance of your device.
  • No Stock Apps (Bloatwares) which further increases the internal storage on your device.
  • And many more…

Any Limitations?

Yes there are some drawbacks of using a Custom ROM:
  • Voids your phone manufacturer’s warranty. (Most of the time it can be restored by installing Stock Firmware)
  • If did not flushed correctly then it might brick  your phone.

Things You Should Know Before Flashing:

There are certain guidelines you should take care of before you start flashing custom rom on your device, so that you are able to safely and successfully flash and update your phone.
  • Download the correct ROM specifically compatible with your device. Just like Custom ROM for Galaxy S3 international variant may not work for AT&T variant of Galaxy S3 and thus you may end up bricking your device, so be careful!!
  • You’ll need Custom Recovery i.e ClockworkMod (CWM)/TWRP Recovery.
  • You should perform full backup of your existing ROM before you flash any new rom, which is called Nandroid Backup.
  • Most Custom ROMs do not come with Google Apps for which you have download GApps package for specific Android OS, which will install default Google Apps like Gmail, G-Search, Play Store and so on.
  • Last but not the least, make sure that you’ve got enough battery charge before you proceed to flash it.

How to Flash Custom ROM?

Hopefully by now you have learned everything about Custom ROM!! Finally now its time to move on further and learn how to safely Flash Custom ROM using Custom Recovery.
Step 1: I assume that you’ve read and implemented the above guidelines.
Step 2: You definitely needs, Custom ROM and GApps zip package and make sure you’ve got both files. Transfer both files to your Micro SD card. Do not extract the files.
Step 3: Reboot your phone into Recovery Mode:
For Samsung phones: Hold the Volume Up+Home+Power buttons all together.
For HTC: Volume Down+Power button and from Menu choose the Recovery option.
For Sony: Volume Up+Power button.
If the above listed method does not for your device, you can Google for your specific device!!
Step 4: Once you booted into Recovery Mode, You’ll be using the Volume Up/Down to navigate between the options and Use Power button to select the desire option.
Step 5: Now perform the following actions in order to prepare your phone for new installations:
  • wipe data/factory reset
  • Wipe Cache
  • Wipe Dalvik Cache
Step 6: Select the option “Install Zip from SD card” and “Choose zip from SD card” and navigate to the directory where you’ve placed the zip file of custom rom.
Step 7: Use the same step 6 to flash GApps package.
Step 8: Head over to main menu and select the option “Reboot” or “Reboot system now” to reboot your phone.
Congrats!! You’ve successfully installed Custom ROM on your Android device!!

How to Root Nokia X Using Framaroot

Nokia has finally entered intothe Android era and they have recently released 3 Android Smartphones. I believe that is something, almost everyone is appreciating and this might take Nokia again to its position where it was!! Today, I have got a good news for those who have got Nokia X, the XDA member,Kashamalaga, has got root access using the Framaroot, which ultimately lets you install apps from Google Play Store. It is strange that Nokia X, being an Android Smartphone, does not have Google Play Store, but instead, it has Nokia Store which lets you install Apps. Use this method to get Rooted and then you’ll be able to install Google Play Store on Nokia X. The root method is really easy and simple, you can call it, One-Click Root method. So without wasting any further time, let’s move on to Root Nokia X Using Framaroot.
Nokia-X-Android-phone-rooted

Guidelines and Requirements:

  • Rooting your phone will voids its warranty.
  • You’ll need Nokia X.
  • Download the latest version of Framaroot v1.9.1 apk (Download Here)
  • Download GApps package for Nokia X (Download Link)

How to Root Nokia X?

1. First of all, download the Framaroot apk from the above link.
2. Once downloaded, transfer the apk file to your phone.
3. Go to Phone Settings, and check allow installations from “Unknown Sources”.
4. On your phone, browse the apk file and install it like a normal apk file.
5. After installing, launch the Framaroot app and tap “Install SuperSU”.
6. Next, Reboot your phone.
Once you’ve rooted Nokia X, its now time to install Google Apps using the GApps for Nokia X. Follow the installations instructions down below.

How to Install GApps?

1. Extract the GApps package and transfer all the apk files to your phone.
2. You’ll need Root Explorer App (Install From Here) or File Explorer free app (Install From Here)
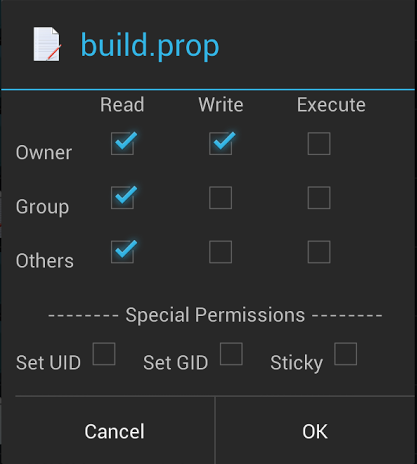
3. Copy the extracted apk files to /System/App and change files permissions:
Root-explorer
4. Reboot your phone.
5. Finally browse the directory where you’ve earlier placed the apk files and one by one install them like normal apk.
6. Congrats!! Now open Google Play Store and it should be working perfect! First it will ask you for Google Account, just enter your email and passwordand Enjoy!